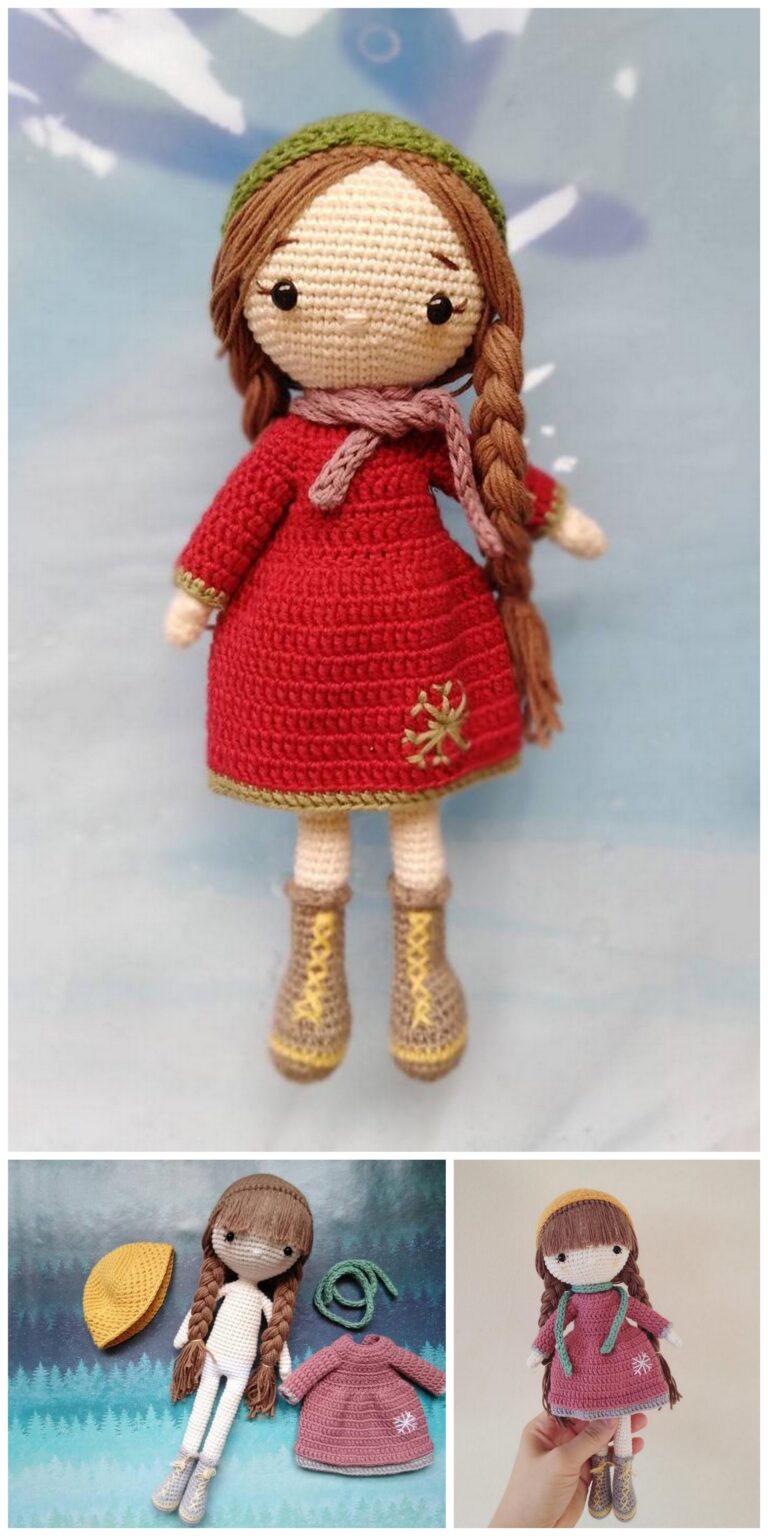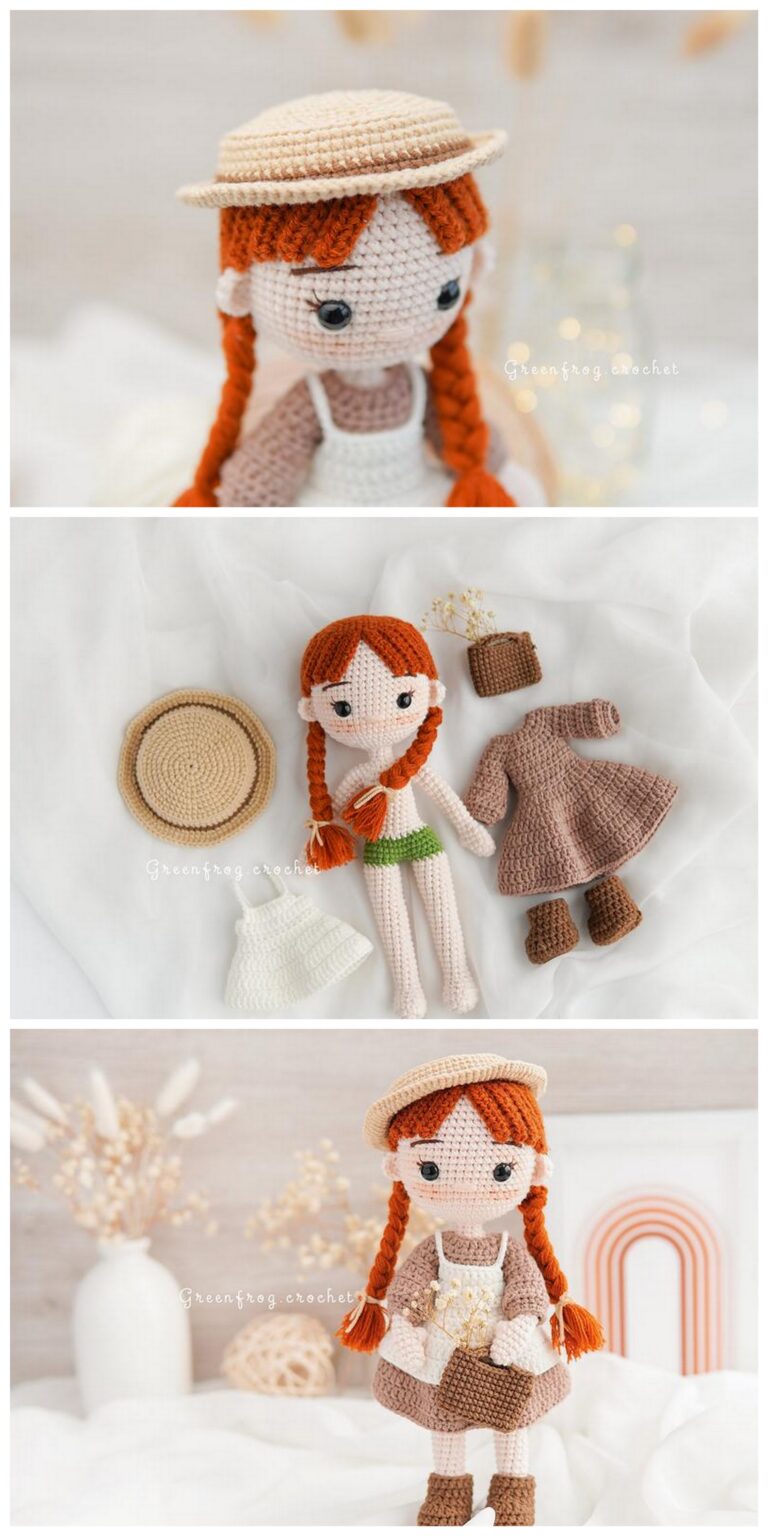

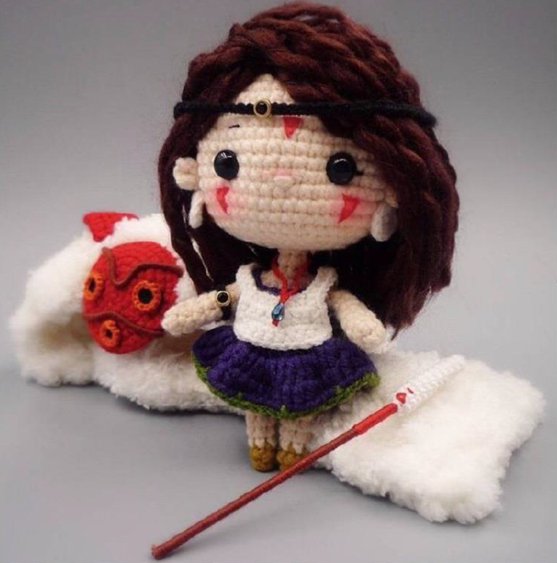
We will need:
Cotton threads (colors: beige, white, red, brown, purple, green, ocher, orange, black)
Hook of the right size
Safety eyes 8mm
Red thread for embroidery
Red pencil
Red wire (for staff and mask)
Teardrop blue bead 5 mm
5mm bead for rim
Hand (2 pieces, beige thread, hook 1.6 mm)
R1 5 sc in amigurumi ring (5)
R2 (sc , increase) * 2 , sc (7)
R3-4 7 sc in a circle 2 rows (7)
R5 sc , decrease , 4 sc (6)
R6 6 sc (6)
R7 sc , decrease , 3 sc (5)
R8 5 sbn (5)
We close the knitting, do not fill, leave a long thread for sewing.
Left leg (hook 1, 6 mm)
R1 we start knitting with ocher 5 sc in amigurumi ring (5)
R2 5 sbn (5)
R3 change the color to beige sbn , increase сб 3 sbn (6)
R4 6 sc (6)
R5 2 sc , increase , 3 sc (7)
R 6 – R7 sc in a circle (7)
We close the knitting, stuff the leg, but not very tightly.
Right leg (hook 1, 6 mm)
R1 we start knitting with ocher 5 sc in amigurumi ring (5)
R2 5 sbn (5)
R3 change the color to beige, 3 sc, increase, sc (6)
R4 6 sc (6)
R5 3 sc, increase, 2 sc (7)
R 6 – R7 sc in a circle (7)
We do not close the knitting, in the last row we change the thread to purple in advance. We stuff the leg, but not tightly. After that, we begin to tie the legs together, forming the body.
Body (purple thread, hook 1.6 mm) R8 2 ch, (take the left leg and start knitting sbn in the 7th row of the leg) 1 ch, return to the right leg, make 7 sbn, fasten the VP by tying 2 sbn into them, knit in VP on the other side also 2 sbn (18)
R9 2 increase , 12 sbn , 2 increase , 2 sbn (22)
R10 sbn , increase , 16 sb , increase , 3 sbn (24)
R11 sc in a circle (24)
R12 3 decreases , 10 sbn , 3 decreases , 2 sbn (18)
R13 change thread to skin color (sbn, decrease) * 6 12
R14-16 12 sbn
R17 now we will knit hands 3sc in the body loops , 5 sc in the loops of 1 hand сб 6 sc again in the body loops , 5 sc in the other hand, 3 sc in the body loops fill the detail (22)
R18 (sc , decrease , 2 sc , decrease) * 3 , sc (16)
R19 8 Decreases (8)
R20 (2 sc , decrease) * 2 (6)
R21-25 6 sc, close knitting and set aside.
Dress (hook 1.6mm)
R1 knit from top to bottom, purple thread 22 VP, connect in a ring, 1 VP, 3 SBN, 3 VP, skip 4 loops, 8 SBN, 3 VP, lower 4 loops, 3 SBN (20)
R2-3 1 vp , 20 sbn
R4 1 vp , 4 ss , decrease , 8 sb , decrease , 4 sb , ss (18)
R5 1 vp , 18 increments, ss (36)
R6 2 vp (pssn , 2 pssn in 1 loop) * 18, ss (54)
R7 2 VP, 54 PRSN, change the thread to green (54)
R8 (5 sc in 1 side of the loop , 1 sc in both sides of the loop) * 9 , close knitting, hide the tail (54)
White cape (hook 1.4mm)
R1 10 ch, knit in 2 loop from the hook , 9 sb , 1 ch , turn (9)
R2 4 sc , decrease , 3 sc , 1 run вп turn (8)
R3 3 sc , decrease , 3 sc , 1 run вп turn (7)
R4 7 sc (7)
R5 9 ch + 7 ch + 1 ch , knit in 2 loop from the hook , 7 sc , 1 ch turn (7)
R6 3 sbn , increase сб 3 sb , 1 run, turn (8)
R7 3 sbn , increase сб 4 sb , 1 run, turn (9)
R8 9 sc (9)
Close knitting and hide the thread.
We take a new white thread and start knitting further:
I was never able to translate this part, so I adapted it for myself, for professionals in the Chinese language I leave the original first, and then my adaptation for those who do not know Chinese.
My adaptation:
We attach the thread to the 5th row on the other side of the dialed 9 VP and also dial 9 VP and attach the chain to the other side (i.e. to the 4th row) and knit in a circle 4 SBN in the side part of the part, 9 SBN at the bottom, 4 SBN in the side part of the part, 9 sbn in the chain loops, 4 sbn in the side part of the part, 9 sbn at the bottom, 4 sbn in the side of the part, 9 sbn in the chain loops and ss in 1 loop. Close knitting. You can tie a belt of 100 VP and use it to tie a cape, it seemed to me superfluous.
Head (beige thread , hook 1.6mm)
R1 6 sc in amigurumi ring (6)
R2 increase x 6 (12)
R3 (sc, increase) x6 (18)
R4 (sc , increase , sc) x6 (24)
R5 (3 sc, increase) x6 (30)
R6 (2 sc , increase , 2 sc) x6 (36)
R7 sc in a circle (36)
R8 (increase, 5 sbn) x6 (42)
R9-10 sc in a circle (42)
R11 (5 sc , increase ка sc) x6 (48)
R12-18 sc in a circle (48)
Attach eyes 8 mm between 14 and 15 rows 9 sbn between them
R19 (2 sc , decrease , 2 sc) x 8 (40)
R20 (3 PRS , decrease) х 8 (32)
R21 (sc , decrease , sc) x 8 (24)
R22 (decrease , sbn) x 8 (16)
R23 (2 sbn , 3 decrease) х2 (10)
R24 we knit only in the back side of the loop 10 sbn (10)
R25-26 10 sc in a circle (10)
Close knitting. We sew the head to the body. You can add wire to the neck if desired.
Ears 2pcs (beige thread , 1.6mm hook)
In the ring 1 ch, 3 ssn, 1 ch, tighten the ring, cut the long thread.
Sew on the ears: we retreat 3 loops from the eye, between 15 and 16 rows.
Face embroidery:
1.Use a thread to make indentations for the eyes, tighten the thread at the back of the head
2.stitch the nose with beige thread
- Make triangles red: embroider or draw
4.embroider eyelashes and eyebrows
Earrings * 2 (white thread , hook 1.4mm)
R1 6 sc in amigurumi ring (6)
R2 sbn п 4 pssn , sbn (6) - Close knitting, leave a long thread. Sew the earring to the bottom of the ear.
Hair (use brown thread)
We cut off the hair with a length of 11 cm 35 segments, attach to the head starting from the 6th row. Covering the entire head with hair, do not forget to take into account that it has a parting. You can use glue to style your hair better. - Mask ears * 2 (red thread , 1.6mm)
R1 2 ch, in 2 loop increase, 1 ch, turn (2)
R2 2 increments , 1 ch, turn (4)
R3 sc , 2 increments , sc , 1 run, turn (6)
R4 (sc , increase , sc) * 2,1 run, turn (8)
R5 8 sbn , 1 run, turn (8)
R6 we tie the part in a circle 4 sbn, in the corner 3 sbn in 1 loop, 4 sbn (11) - Close knitting, leave a long thread.
Red base for mask (red thread , 1.6mm)
R1 4vp, start with 2 loops from the hook, knit on both sides, 2 sbn, 3 sbn in 1 loop, sbn, 2 increments (10)
R2 2 increments, sc, 3 increments, sc, 3 increments (18)
R3 sc, raise, sc (sc, raise) * 3 , sc , (sc, raise) * 3 (23)
R4 3 sc, raise, sc, raise, 3 sc, raise, 3 sc, raise, sc, raise, 3 sc, raise, 3 sc, raise (31)
R5 3 sc, raise, sc, (3 sc, raise) * 3 , sc (3 sc, raise) * 2 4 sc, raise (38)
R6 4 sb , increase , 7 sb , increase , 6 sb , increase , sb , increase , 6 sb , increase, 8 sbn, ss (43)
We close the knitting, hide the thread. The mask is obtained in the form of an ellipse, slightly concave outward. - Eye mask * 2 (3 strand floss , hook 1.1mm)
R1 black thread 8 sbn in amigurumi ring , ss (8)
R2 we change the thread to red, we knit only in the front part of the loops 1 in , (sbn, increase) * 4 (12)
We close the knitting, hide the thread.
Mouth mask (3 strands floss , hook 1.1mm)
R1 black thread, 6sc in amigurumi ring, ss (6)
R2 we change the thread to red, we knit only in the front part of the loops 1 ch, 6 increments (12) - We close the knitting, hide the thread.
Assembling the mask (1.5mm wire)
We bend the wire in the way we need and attach the mask. Sew the eyes and mouth to the base. You can use glue to attach the wire better. (from the translator: I decided to go the other way, since I did not have the necessary wire at hand. I made two chains of 20 VP and sewed them in the same way as the wire on the mask goes.)
Mask white part (1.6mm hook , 3mm hook) - We start to knit into the upper part of the mask
R1 5 sbn , 1 VP , skip the wire (or, as I have a chain from VP) , 5 sbn , increase , 4 sb , 1 VP ,
skip the wire (or, as I have a chain from VP) , 5 sbn , 1 VP , turn (23)
R2 (sbn вп 2 VP , skip 1 loop) * 11 , sbn (34) close knitting.
We take a thicker thread and begin to knit into a hole from 2 VP (knit not very tightly, otherwise the part will be very dense) - R3 1 ch , increase , 4 sb , increase , 4 sb , increase , 1 ch , turn (14)
R4 increase , 5 sb , increase , 6 sb , increase , 1 VP (turn (17)
R5 increase , 7 sc , increase , 7 sc , increase , 1 VP вп turn (20)
R6 20 sbn, turn (20)
R7 2 PRS , 7 PRSN , decrease (2 PRSN tie together) , 7 PRSN н 2 PRS , 1 VP , turn (19) - R8 decrease , 6 prsn , decrease (2 prsn tie together) , 6 prsn , decrease, close knitting (16)
Pull back an equal number of loops on 2 sides and start knitting
R9 2 vp , 2 prsn , decrease (2 prsn tie together), 3 prsn , decrease (2 prsn tie together) , 2 prsn , 2 vp , turn (8)
R10-11 8 pssn , 2 run , turn (8)
R12 3 prsn , decrease (2 prsn tie together), 3 prsn (7)
Close knitting, then sew the ears to the mask.
Cloak (hook 1.6mm , hook 3mm)
R1 white thread 80 VP (80)
R2 retreat 16 VP and start knitting , 1 VP , (sb , 2vp, skip 2 loops) * 5 , sb , close knitting (16) - We take a thicker thread and begin to knit into a hole from 2 VP (knit not very tightly, otherwise the part will be very dense)
R3 1 ch , increase , 3 sb , increase , 1 ch , turn (7)
R4 3 sbn , increase сб 3 sbn , 1 run , turn (8)
R5 increase , 6 sc н increase , 1 VP turn (10)
R6-7 10 sbn , 1 run , turn (10)
R8 10 sc (10) - Close knitting.
Spearhead (1.1mm hook)
R1 5 sc in amigurumi ring (5)
R2 increase , 4 sbn (6)
R3 6 sc (6)
R4 increase , 5 sbn (7)
R5 7 sc (7)
R6 increase , 6 sbn (8)
R7-12 8 sc (8) - Close knitting. Hide thread. Make red embroidery on the tip.
We make jewelry (necklace, headband, arm band) and attach everything to the doll. And your princess Mononoke is ready!
More Images;