Horse Amigurumi – Free Crochet Pattern
scroll ⬇️ to get the pattern & tutorial
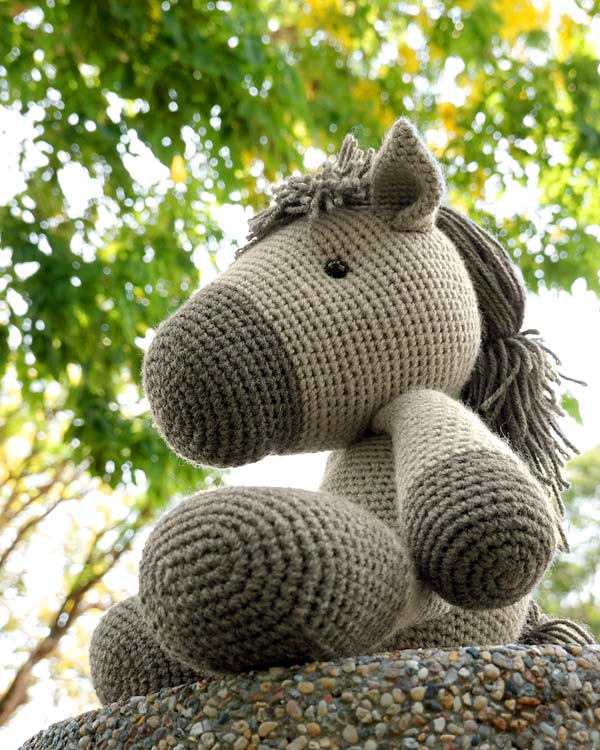
Hessy, just like all other horses, loves a good roll in the hay. Especially on sunshiny days like today, it’s impossible not to want to run out the door and feel the wind against his face. Why today? Because there’s going to be a summer festival in the neighborhood, which means all the other horses and animals will be there and he can meet all his friends.
There’s a knock on the door and Hessy eagerly opens it, to find Papa Hessy at the door, looking all smart and groomed. “Let’s go”, he says to Hessy and together they troop out of the home. Joining them outside are Mama Hessy and his little brother, equally dressed up and smiling in excitement.,

Hessy found his friends and separated from his parents to hang out with them. They found a nice spot under the big oak tree and spent the rest of the day, chewing on straw and telling tales of their hopes and dreams, while happily whisking their tails.
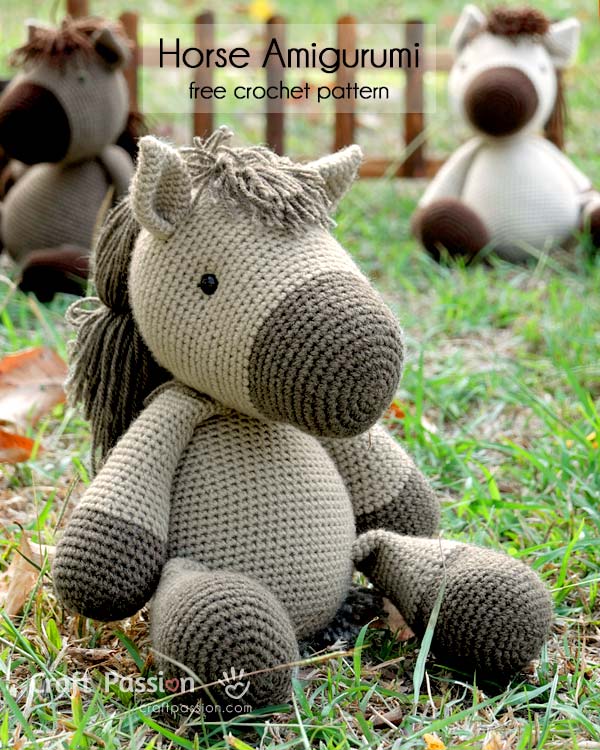
The horse amigurumi family looks so handsome with their long manes and matching tufts of hair.

You can learn how to crochet this fun-loving horse amigurumi pattern today with the free crochet pattern I have prepared for you. When you start, you will realize how satisfying it is to have a whole flock of crochet animals in your home and trust me, you will want to keep making more!
Hessy the horse amigurumi loves to have company, especially when his friends are around. So give him some crochet stuffed animal friends to play with and you will enjoy many hours of amigurumi crochet fun.


yield: 14″ HORSE AMIGURUMI OR 11.5″ FOAL AMIGURUMI STUFFED ANIMAL (STANDING) active time: 3 DAYS total time: 3 DAYS difficulty: INTERMEDIATE /ADVANCE LEVEL estimated cost: USD 20
Free crochet pattern of a handsome Horse Amigurumi, Hessy, that you can crochet by following the instructions and written pattern. An absolutely perfect gift for those that love Animal & Wildlife.
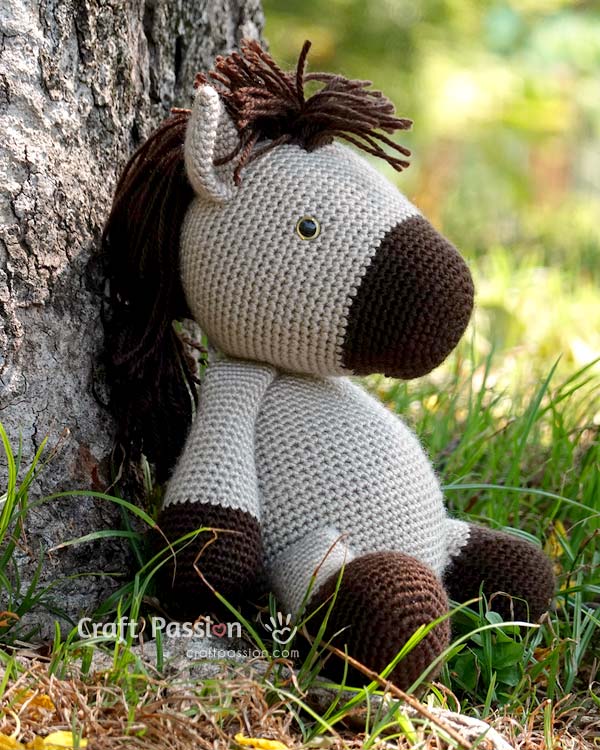
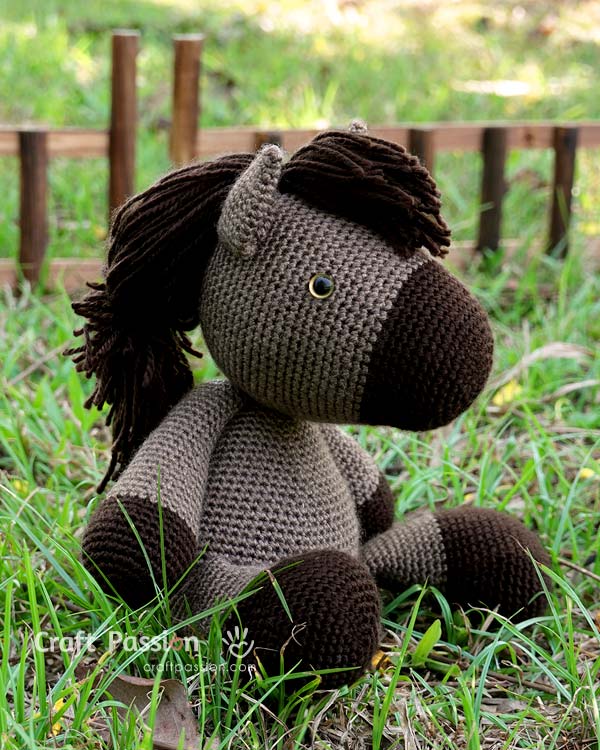
Both Horse and its foal are crochet from the same pattern. The foal appears in a smaller size because it is crochet from la slightly lighter yarn than the horse. Apart from the yarn, horse and foal are using a different kind of eyes to make them look a little bit distinctive.
Hessy, just like all other horses, loves a good roll in the hay. Especially on sunshiny days like today, it’s impossible not to want to run out the door and feel the wind against his face. Why today? Because there’s going to be a summer festival in the neighborhood, which means all the other horses and animals will be there and he can meet all his friends.
Materials
Horse
- Acrylic yarn, DK/Light Worsted Weight, 2 colors, 100g ball each
- Black Domed Button, 10mm, 2 pcs.
- Polyester fiberfill
Foal
- Acrylic yarn, Sport Weight, 2 colors, 100g ball each
- Safety Eyes (Brown Iris), 10mm, 2 sets
- Polyester fiberfill
Tools
- 2.5mm crochet hook
- Darning needle
- Long Sewing Needle (about 2″) and strong thread (to sew button eyes)
- 4″ x 6″ Cardboard (for winding the yarn for the mane)
- Fabric marker (water erasable)
- Scissors
- Pins
Instructions
- Crochet all parts by following the crochet patterns stated below.
- Stuff the parts as instructed.
- Wind yarns on the cardboard. Cut about 50 strips of 4″ long yarn and 100 strips of 12″ long yarn (as the mane and tail of the horse)
- Sew button eyes (for horse) and ears to the head.
- Sew body to the head followed by sewing arms and legs to the body
- Fasten mane and tail to the horse with the strips cut in #3.
Abbreviations
ch: chain
sc: single crochet
inc: 2sc increase
inv dec: invisible decrease
HORSE AMIGURUMI PATTERN
Body
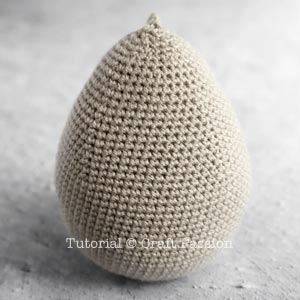
With Light Color yarn:
Round 1: ch5, Inc in 2nd ch from hook, sc 2, 5sc in the last ch. Continue on the other side of the chain base, sc 2, 3sc in the last ch. {14}
Round 2: Inc, sc 4, [Inc] 3 times, sc 4, [Inc] 2 times. {20}
Round 3: Inc, sc 6, [Inc] 2 times, sc, Inc, sc 6, [Inc] 2 times, sc. {26}
Round 4: Inc, sc 8, [Inc, sc] 2 times, Inc, sc 8, [Inc, sc] 2 times. {32}
Round 5: Inc, sc 10, Inc, sc 2, Inc, sc, Inc, sc 10, Inc, sc 2, Inc, sc. {38}
Round 6: Inc. sc 12, [Inc, sc 2] 2 times, Inc, sc 12, [Inc, sc 2] 2 times. {44}
Round 7: Inc, sc 14, Inc, sc 3, Inc, sc 2, Inc, sc 14, Inc, sc 3, Inc, sc 2. {50}
Round 8: Inc, sc 16, [Inc, sc 3] 2 times, Inc, sc 16, [Inc, sc 3] 2 times. {56}
Round 9: sc around. {56}
Round 10: sc 25, Inc, sc 27, Inc, sc 2. {58}
Round 11: sc 26, Inc, sc 28, Inc, sc 2. {60}
Round 12: sc 27, Inc, sc 29, Inc, sc 2. {62}
Round 13: sc 28, Inc, sc 30, Inc, sc 2. {64}
Round 14 – 23: sc around. {64}
Round 24: sc 6, [Inv dec, sc 14] 3 times, Inv dec, sc 8. {60}
Round 25: sc around. {60}
Round 26: sc 6, [Inv dec, sc 13] 3 times, Inv dec, sc 7. {56}
Round 27: sc around. {56}
Round 28: sc 6, [Inv dec, sc 12] 3 times, Inv dec, sc 6. {52}
Round 29: sc around. {52}
Round 30: sc 6, [Inv dec, sc 11] 3 times, Inv dec, sc 5. {48}
Round 31: sc around. {48}
Round 32: sc 6, [Inv dec, sc 10] 3 times, Inv dec, sc 4. {44}
Round 33: sc around. {44}
Round 34: sc 6, [Inv dec, sc 9] 3 times, Inv dec, sc 3. {40}
Round 35: sc around. {40}
Round 36: sc 6, [Inv dec, sc 8] 3 times, Inv dec, sc 2. {36}
Round 37: sc around. {36}
Round 38: [sc 4, Inv dec] around. {30}
Stuff the body firmly with polyester fiberfill.
Round 39: sc around. {30}
Round 40: sc 2, [Inv dec, sc 3] 5 times, inv dec, sc. {24}
Round 41: [sc 2, Inv dec] around. {18}
Round 42: [Inv dec, sc] around. {12}
Round 43: [Inv dec] around. {6}
Fasten and leave a long tail for sewing.
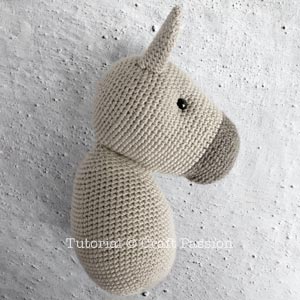
Head
With Dark Color yarn:
Round 1: sc 6 in magic ring. {6}
Round 2: [inc] around. {12}
Round 3: [inc, sc] around. {18}
Round 4: [sc 2. inc] around. {24}
Round 5: [inc, sc 3] around. {30}
Round 6: sc 2, [inc, sc 4] 5 times, inc, sc 2. {36}
Round 7: [inc, sc 5] around. {42}
Round 8 -9: sc around. {42}
Round 10: sc 38, [inv dec] 2 times. {40}
Round 11: [inv dec] 2 times, sc 36. {38}
Round 12: sc 36, [inc] 2 times. {40}
Round 13: [inc] 2 times, sc 38. {42}
Note: Round 10 to 13 will create a sunken impression, this is the mouth of the horse.
Round 14: sc 3, [inc, sc 6] 5 times, inc, sc 3. {48}
Change yarn to light color
Round 15 – 16: sc around. {48}
Round 17: sc 3, [inc, sc 7] 5 times, inc, sc 4. {54}
Round 18 – 19: sc around. {54}
Round 20: [sc 8, inc] around. {60}
Round 21 – 23: sc around. {60}
Round 24: sc 5, [inc, sc 9] 5 times, inc, sc 4. {66}
Round 25 – 32: sc around. {66}
Round 33: [inv dec, sc 9] around. {60}
Round 34: sc around. {60}
Round 35: sc 4, [inv dec, sc 8] 5 times, inv dec, sc 4. {54}
Round 36: sc around. {54}
Round 37: [inv dec, sc 7] around. {48}
Round 38: sc around. {48}
Round 39: sc 3, [inv dec, sc 6] 5 times, inv dec, sc 3. {42}
Round 40: sc around. {42}
Round 41: [inv dec, sc 5] around. {36}
Round 42: sc 2, [inv dec, sc 4] 5 times, inv dec, sc 2. {30}
Round 43: [inv dec, sc 3] around. {24}
For Foal Amigurumi, install safety eyes at Round 22. The distance between 2 eyes is about 20 sts. Note that the mouth should point downward. Mark the top centerline of the head, at Round 22 count 10 stitches to the left/right to install the safety eye. Repeat the same to install the other eye.
Stuff with polyester fillings
Round 44: sc, [inv dec, sc 2] 5 times, inv dec, sc. {18}
Round 45: [inv dec, sc 1] around. {12}
Round 46: [inv dec] around. {6}
Fasten and hide yarn end.
Ears
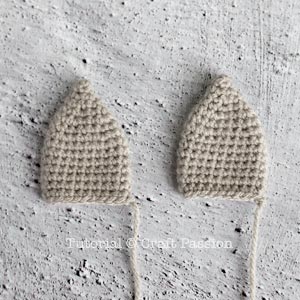
Make 2 with light color yarn:
Round 1: Sc 4 in magic ring. {4}
Round 2: sc around. {4}
Round 3: [inc] around. {8}
Round 4: sc around. {8}
Round 5: [inc, sc] around. {12}
Round 6: [inc, sc 2] around. {16}
Round 7: sc around. {16}
Round 8: [inc, sc 3] around. {20}
Round 9 – 15: sc around {20}
Fasten and leave a long tail for sewing.
Fold the ear and sew the bottom to give it a scooped appearance.
Arms
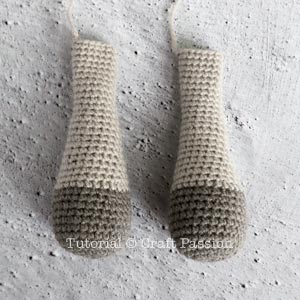
Make 2 starting with Dark Color yarn:
Round 1: sc 6 in magic ring. {6}
Round 2: [inc] around. {12}
Round 3: [inc, sc] around. {18}
Round 4: [sc 2. inc] around. {24}
Round 5: [inc, sc 3] around. {30}
Round 6 – 10: sc around. {30}
Round 11: [sc 8, Inv dec] around. {27}
Round 12: sc around. {27}
Change yarn to Light Color.
Round 13: sc around. {27}
Round 14: [sc 7, Inv dec] around. {24}
Round 15 – 16: sc around. {24}
Round 17: [sc 6, Inv dec] around. {21}
Round 18 – 19: sc around. {21}
Round 20: [sc 5, Inv dec] around. {18}
Round 21 – 22: sc around {18}.
Round 23: [sc 4, Inv dec] around. {15}
Round 24 – 35: sc around. {15}
Fasten and leave a long tail for sewing.
Fill the bottom 2/3 of the arms firmly with polyester fiberfill.
Legs

Make 2 starting with Dark Color yarn:
Round 1: ch5, Inc in 2nd ch from hook, sc 2, 5sc in the last ch. Continue on the other side of the chain base, sc 2, 3sc in the last ch. {14}
Round 2: Inc, sc 4, [Inc] 3 times, sc 4, [Inc] 2 times. {20}
Round 3: Inc, sc 6, [Inc] 2 times, sc, Inc, sc 6, [Inc] 2 times, sc. {26}
Round 4: Inc, sc 8, [Inc, sc] 2 times, Inc, sc 8, [Inc, sc] 2 times. {32}
Round 5: Inc, sc 10, Inc, sc 2, Inc, sc, Inc, sc 10, Inc, sc 2, Inc, sc. {38}
Round 6: Inc. sc 12, [Inc, sc 2] 2 times, Inc, sc 12, [Inc, sc 2] 2 times. {44}
Round 7 – 10: sc around. {44}
Round 11: sc 14, Inv dec, sc 12, Inv dec, sc 14. {42}
Round 12: sc 14, Inv dec, sc 10, Inv dec, sc 14. {40}
Round 13: sc 14, Inv dec, sc 8, Inv dec, sc 14. {38}
Round 14: sc 14, Inv dec, sc 6, Inv dec, sc 14. {36}
Round 15: sc 14, Inv dec, sc 4, Inv dec, sc 14. {34}
Round 16: sc 14, Inv dec, sc 2, Inv dec, sc 14. {32}
Round 17: sc 14, Inv dec, Inv dec, sc 14. {30}
Change yarn to Light Color Yarn.
Round 18: sc around. {30}
Round 19: [sc 6, Inv dec] 3 times, sc 6. {27}
Round 20 – 21: sc around. {27}
Round 22: sc 6, [Inv dec, sc 5] 3 times. {24}
Round 23 – 24: sc around. {24}
Round 25: sc 5, Inv dec, sc 10, Inv dec, sc 5. {22}
Round 26 – 27: sc around. {22}
Round 28: sc 5, Inv dec, sc 9, Inv dec, sc 4. {20}
Round 29 – 30: sc around. {20}
Round 31: sc 4, Inv dec, sc 8, Inv dec, sc 4. {18}
Fasten and leave a long tail for sewing.
Fill the bottom 2/3 of the legs firmly with polyester fiberfill.
HOW TO ASSEMBLE THE HORSE AMIGURUMI
Cut Yarn Strips for Mane
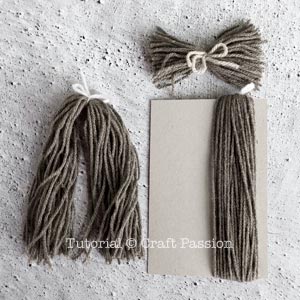
Wind 25 rounds of yarn along the short side of the 4″ x 6″ cardboard. Cut both ends to make about 50 strips of 4″ long yarn.
Wind about 25 rounds of yarn along the long side of the cardboard. Cut only one end to make 25 strips of 12″ long yarn, repeat 4 times to get 100 strips.
The short strips are for the forehead mane, the long strips are for the back and the tail. The amount is only an approximate, you can add more if you prefer your horse has a fuller mane and vise versa.
Sew Eyes
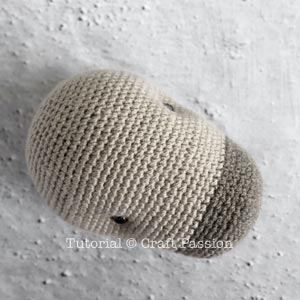
For horse amigurumi, the eyes are sewn-on button (10mm black domed button). The eyes are sewn at Round 24. The distance between 2 eyes is about 24 sts.
Place the head so that the mouth is pointed downward. Mark the top centerline of the head, at Round 24 count 12 stitches to the left/right to sew the first button eye. Use a few strands of strong thread, and a long needle. After knotting the first eye, insert your needle onto the head and come out from the second eye’s position. Pull the thread to sink the button eye deep into the head, deeper than what you prefer. Knot the thread on the second eye before sewing the second button eye. The second eye will sink into the head as well due to the tension of the thread. Sew the thread back to the first eye and knot, this is to further secure the indentation of the eye. You may use a tapestry needle and yarn to sew if they can pass through the hole of the button.
Stitch On Ears
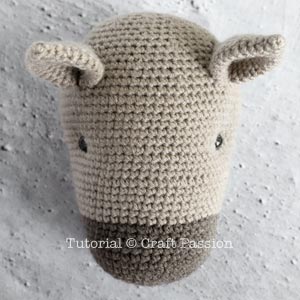
Stitch ears at Round 32 and the distance between 2 ears is 20 sts (count from the fold seam of ear)
In order to make the ear standing vertically straight on the curve of the head, slightly push the ear to incline to the center of the head, then sew about 3 stitches from the folded seam of the ear towards the center of the head. Continue to sew around the base of the ear to the head to complete the assemble. Repeat the same to the second ear.
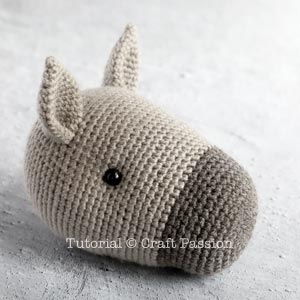
Sew All Parts To The Body,
You have Head, Body, Arms, Legs and Yarn Strips to make the final joining up.
Sew Head To Body

Mark about 3 sts x 14 rows at the center bottom of the head. Mark the same to the body from the top center to the front of the body. These are the joining part of the head and body.
With tapestry needle and yarn, sew to attach the head to the body. The head is tilting forward as shown in the picture.
Sew Arms And Legs To The Body
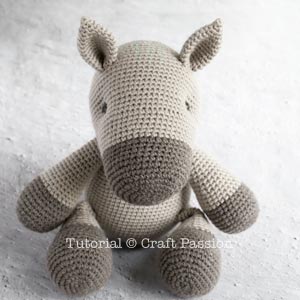
Place the arms between the head and the body, stitch around to join them to the horse amigurumi.
Lastly, Stitch the legs at Round 14, about 18 sts apart.
Mane And Tail Installation
Mark the mane position of the head, it is about 5 stitches wide, straight down to the back of the head (about 22 rows). The first 6 rows are short mane.


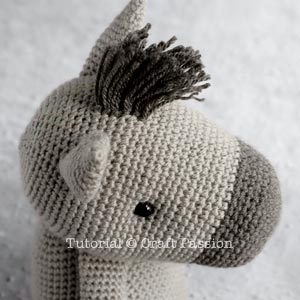
This is how the mane of the horse amigurumi looks like after 6 rows.
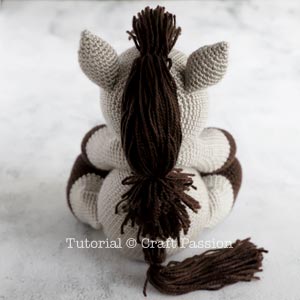
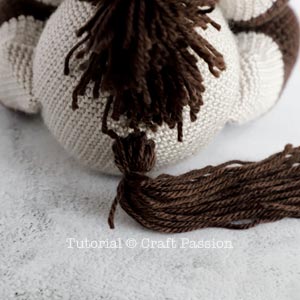
Continue to fasten until you have done a total of about 22 rows. Use a short yarn to tie up the mane.
Mark a circle of about 3/4″ diameter that back of the horse as the tail position. Fasten the yarn strips in the same manner.